What is the Scenarios section?
The Scenarios section is used to input the initial conditions for each experiment (temperature, volume, initial reactant amounts, etc.). The Scenarios section is divided into columns (||, Id, Scenario, variable name 1, variable name 2,..., variable name n) as shown below. The Id is the name of the data set in the Experimental Data section for the experiment.
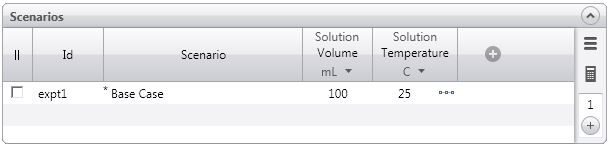
Scenarios section for the Heck reaction model
There are three scenarios in the Heck reaction model. The first one is called Base case and lists all the initial conditions of the experiments (0.12 moles of 4-Bromobenzaldehyde, 0.2 moles of Butyl Acrylate, 0.28 moles of NaOAc in the presence of a palladium catalyst (0.04 mmol)). The solution volume and temperature is also listed. The asterisk shows that in front of the name shows that the first scenario is the base case.
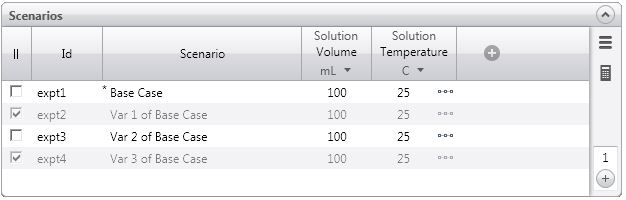
The second and third experiments focus on changing the amounts of the starting materials (4-Bromobenzaldehyde and Butyl Acrylate). These differences from the Base case are shown in Bold.
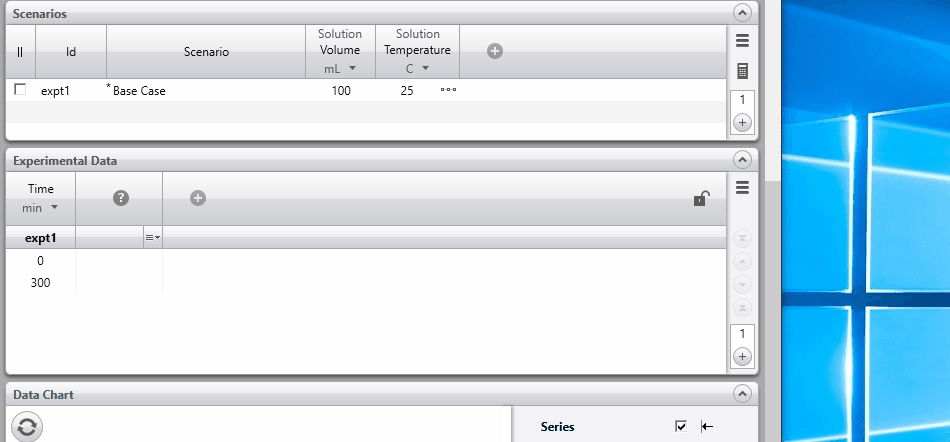
The column to the left of Scenario (called Id) list the Id of the experimental dataset. In the Heck reaction, the experimental data for the Base case is located in the the Experimental Data section under the expt1 header. The leftmost column (||) contains a checkbox for each scenario. This is useful, if you want disable the scenario. When this is done, the scenario will not be exported or used by Simulator, Fitting or Optimization.
More information on scenarios is provided below.

Adding a new scenario
Use the button at the bottom in the right side of the panel to add new scenarios. Change the number above the + icon

to specify the number of new scenarios to add. Then click on the + icon to add this number of scenarios. In this, case, we are creating one scenario.
You will see that the new scenario is an exact duplicate of the first one with two differences. It refers to a dataset, which has been added, and the scenario name is a variation of the first scenario (e.g. Var of Base Case).
You can change the name of any scenario by clicking on the name and typing. You can also change the dataset referenced by the scenario by using the dropdown menu located in the Id column.
Disabling a scenario
To disable a scenario, click in the check box in the column with the double pipe lines  . A disabled scenario will be grayed out (see below) and will not be exported or used by Simulator, Fitting or Optimization. You cannot disable the base case scenario.
Adding a new scenario header
Click on the  icon shown.
You will see the following menu (the list of items depends on the materials defined in the Materials section, and the phases, rates and calculations defined in the Process Scheme section.
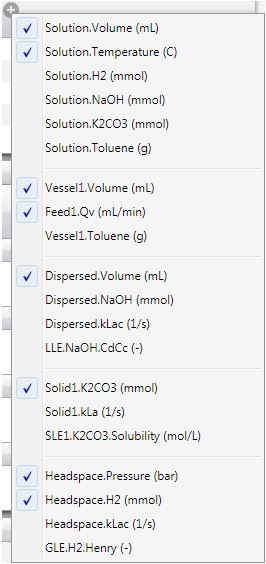
To add Solution.NaOH above, just select it when the window is open.
For example:
1. If there is a solid phase present (e.g. Solid1 containing NaCl), the amount of the material (e.g Solid1.NaCl,mmol) will be added automatically as a scenario header when the phase is defined in the Process Scheme section. The other options then are:
Solid1.NaCl.kLa (1/s)
SLE.NaCl.Solubility (mol/L)
where SLE denotes the solid-liquid equilibrium
2. If there is a gas phase present (e.g. Headspace containing H2), the amount of the material (Headspace.H2, mmol) and the pressure (Headspace.pressure, bar) will be added automatically as scenarios headers when the phase is defined in the Process Scheme section. The other options then are:
Headspace.H2.kLac (1/s)
GLE.H2.Henry (-)
where GLE denotes the gas-liquid equilibrium
3. If there is an immiscible phase (e.g. Dispersed containing Reagent) present, the volume of the dispersed phase (Dispersed.Volume, ml) will be added automatically as a scenario header when the phase is defined in the Process Scheme section. The other options are:
Amount of the material in the dispersed phase, e.g. Dispersed.Reagent (mmol)
Dispersed kLac (1/s)
LLE.Reagent.CdCc (-)
where LLE denotes the liquid-liquid equilibrium.
4. If there is a Feed tank present, (e.g. Vessel1 containing Reagent), the volume of the Feed tank (Vessel1.Volume, ml) and the amount of the material (vessel1.Reagent, mmol) and feed flowrate (Feed1.Qv, ml/min) are automatically added as scenario headers when the feed flow is defined in the Process Scheme section. See below, if you want to set a variable flowrate (How to set an imposed temperature/feed profile).
Setting a different scenario as the Base case
Select the scenario that you want to set as the Base case. Right-click on the chosen scenario to bring up a menu. Select Set as Base Case as shown below:

Deleting a scenario
There are 2 ways to delete a scenario:
1. Select the scenario. Press Delete to delete the scenario or Ctrl+Delete to delete the scenario and the corresponding dataset
2. Select the scenario, right-click and select either Delete or Delete (inc data set)
How to set an Imposed Temperature/Feed profile
To impose a temperature profile in a scenario, first click on the following icon  that is located to the right of the temperature value, as shown below.

This will open the following window, where there are two options: (i) you can increase/decrease the temperature (Ramp to button), or (ii) you can hold the temperature over a certain time period (Hold button).
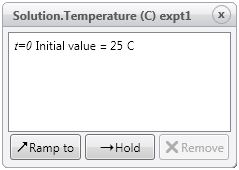
To impose a temperature profile, say holding it for 10 minutes at 25C, and then ramping the temperature up to 50C over 2 minutes, you click on the Hold button and then click on the Ramp to button. You can then modify temperature that you want to increase (or decrease) to and the length of time (in minutes). A temperature profile can use as many ramps and holds as you wish.

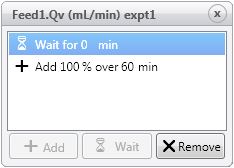
The second variable that you can impose is the Feed profile. To add a step in the Feed profile, click on either the Add or Wait buttons. For example, if you want to add the entire contents of the Feed Vessel (where the feed flow is called Feed1) over 60 minutes, you would select Add, and then type in 100% over 60 minutes as show below:
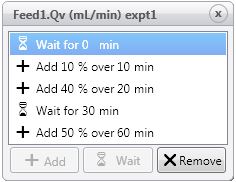
Another example is shown below, where you add 10% over 10 minutes, then a further 40% over 20 minutes. Wait for 30 minutes, and add the remaining 50% over 60 minutes.
Using the Calculator
Section to be added shortly.